In this mobile era, work happens on our phones, tablets and laptops everywhere we go. Mobile revolution, together with nearly limitless compute and data in the cloud, has transformed our professional experience. Power Apps is an enterprise service for innovators everywhere to connect, create and share business apps with your team on any device in minutes.
This will be the first post of Power Apps series for beginners, in this post we will see how to connect to a Dynamics 365 and create a sample application to retrieve CRM – Accounts and update a record.
Pre-requiste:
- Dynamics CRM basics (esp. security roles and permissions).
- Dynamics 365 instance with valid user license and privileges.
Introduction:
Login to Office 365 and select the Power Apps in the Apps section as shown in the below figure

Within few minutes the Power Apps home page will be displayed as shown in the below figure
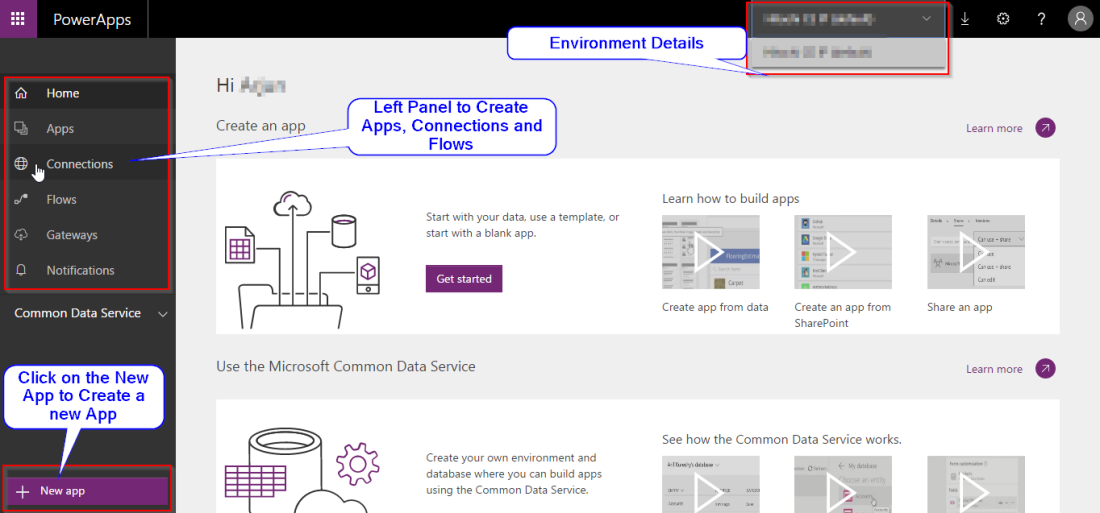
Click on the New Apps to create a new App.
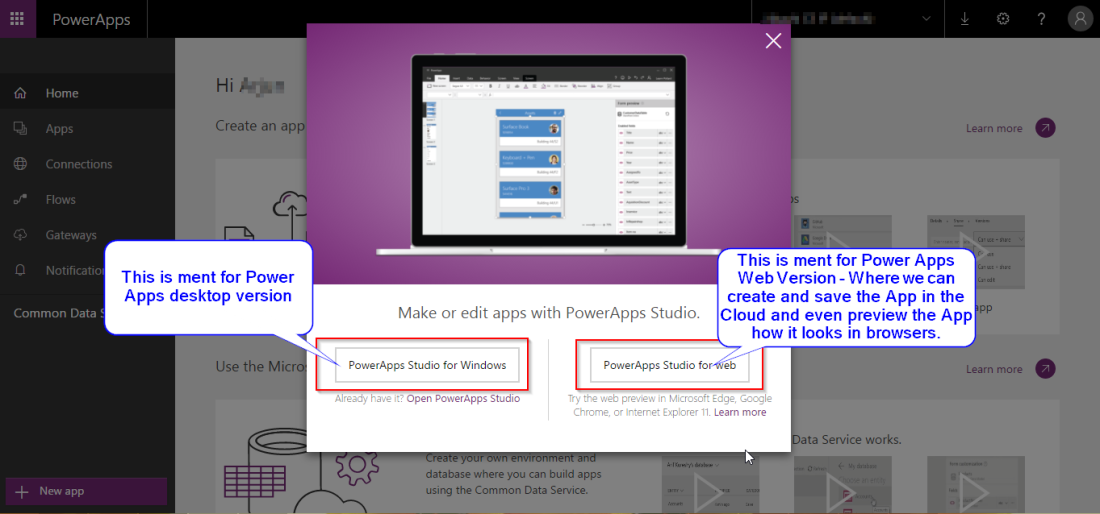
Select the Power Apps Studio for Web as shown in the figure below
There are some predefined App Sources listed as shown in the figure
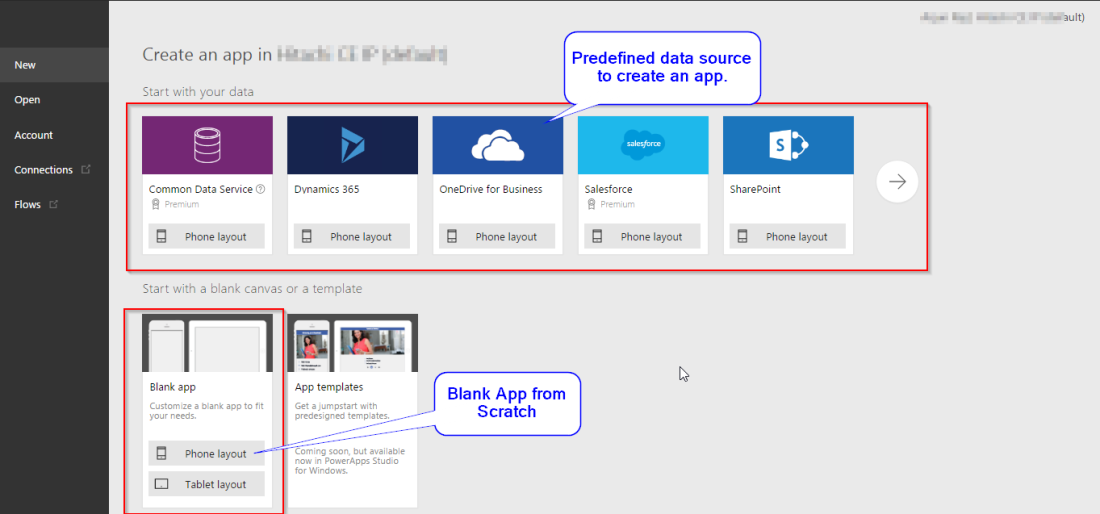
Predefined Data Source – Here we have different data sources such as “Dynamics 365”, “Sales Force” etc., and we will create a app specifically to a particular entity (Table) inside the data source. For Example : We can create an application only for Accounts entity(table) in MS CRM.
Build Apps from Scratch – Where we can add multiple data sources and work across it.
Example : We can add a Accounts table form Dynamics 365 and also we can add an Excel table and create an App.
Click on the Blank App and select the “Phone Layout”. The Power Apps studio loads as shown in the below image
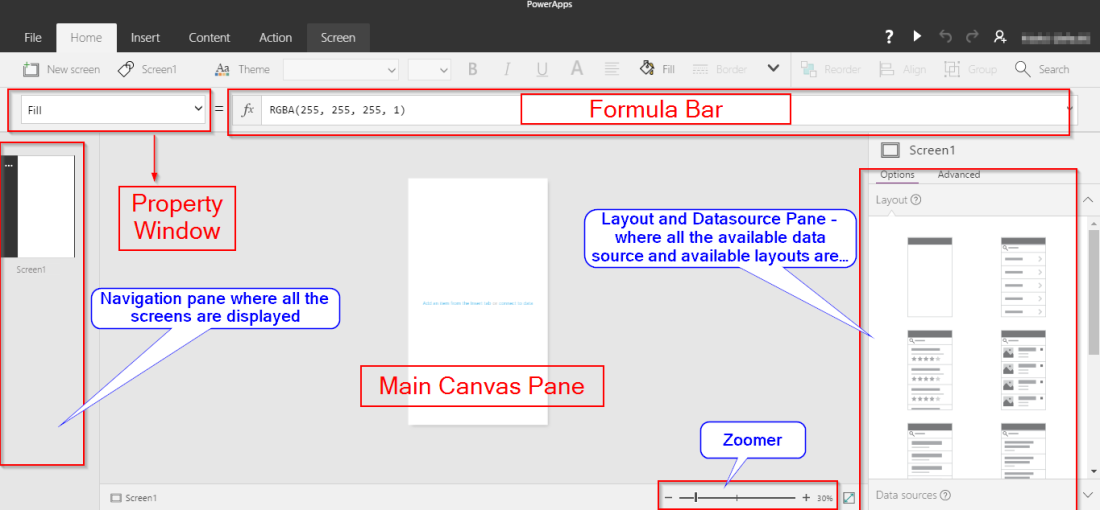
Select first layout and let’s start building an app for Contacts and Accounts in the Dynamics 365.
-
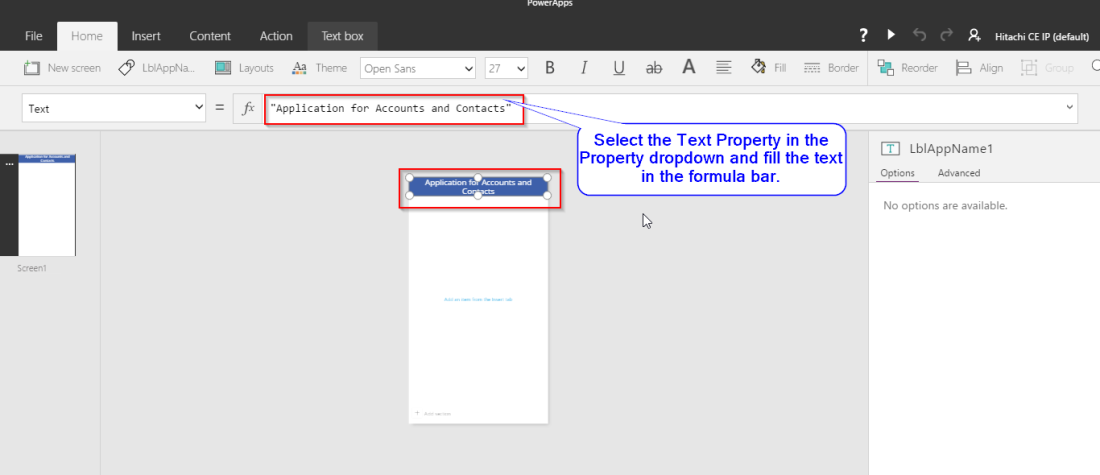
- Select the Text property in the formula bar as shown below or (In the Right pane – switch to “Advanced” tab and scroll down to “Text Property” and enter the Text)
Note: If the text we are entering contains space then please enclose the text within the double quotes.
-
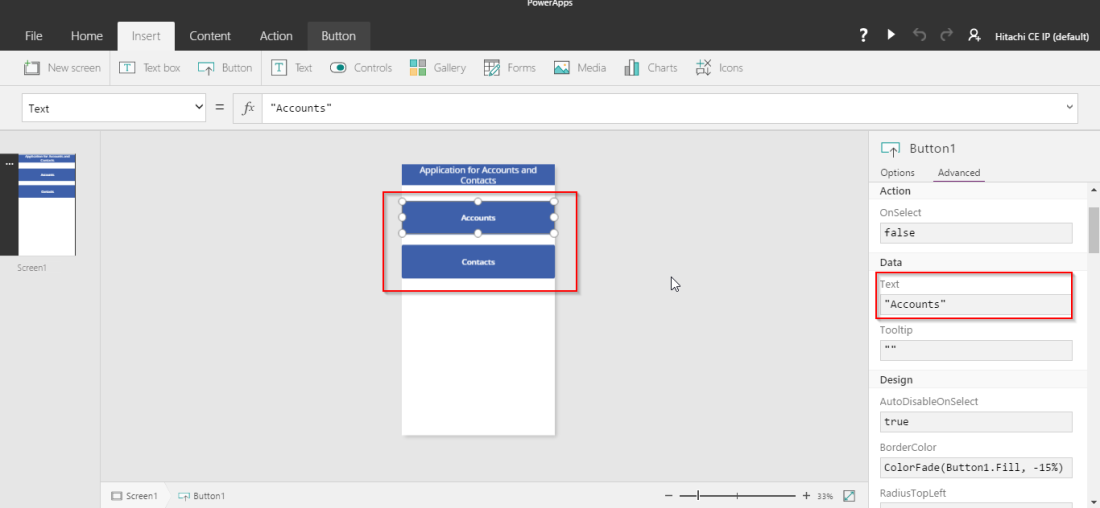
- In the body section of the Application window (below the title bar) insert a button from the “Insert -> Controls -> Button” and rename the button with name “Account” and another button with name “Contact”.
-
- “OnSelect” Property of the Accounts button – We have to show the list of Accounts. So first create the Data Source for “Accounts” from Dynamics 365.
- Click outside the canvas and in the Right pane navigate to the “Options” tab select the Data Source section and click on “Add Connection” and select the “Dynamics 365” option. Select the Organisation from the list of Organisation and select the “Accounts” entity from the list of entities.


-
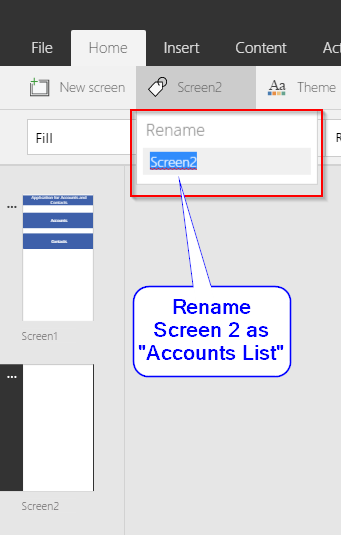
- Click on the “Accounts” button and “OnSelect” property of the button we have to navigate to a new page where list of all accounts are displayed. So first create another screen by clicking the (…) which appears near the current screen in the left pane and click on “New Slide”.

-
- Rename the new Screen name to “Accounts list”.
-
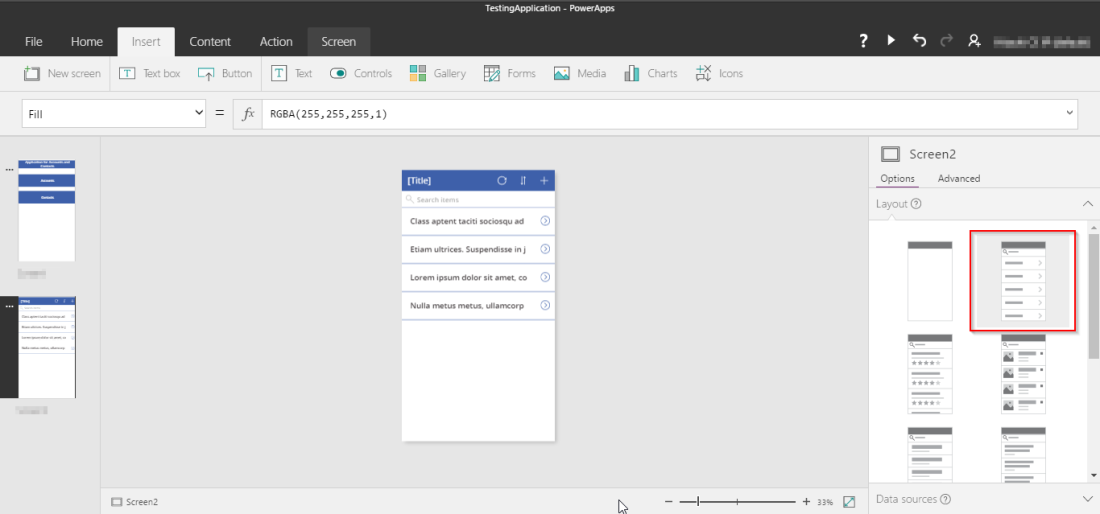
- Select the Second layout for the new screen.
-
- Click on the “Title” and rename the text property as “Accounts”. Click on the list displayed and set the “Items” property in the property bar as
SortByColumns(Search(Accounts, TextSearchBox1.Text, “name”), “name”, If(SortDescending1, SortOrder.Descending, SortOrder.Ascending))
Syntax:SortByColumns (Search(“”, Search Box text, “Column to be displayed as list”, “column to be displayed”,””))
-
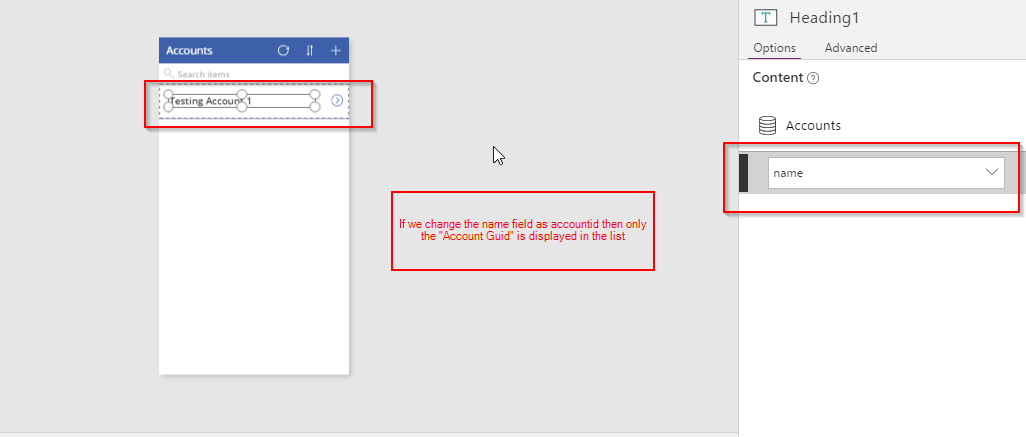
- In the Right panel (Content Pane) you can see the “Accounts” data source mapped if not (Click on the datasource icon and select the data source) as shown in the below figure
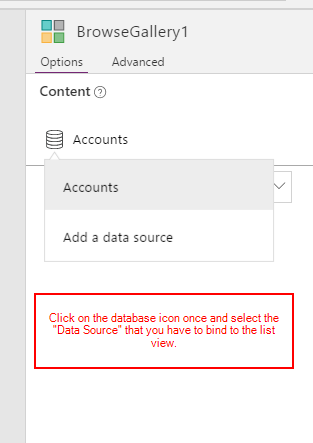
-
- And in the dropdown select the “name” field which is displayed in the list view of the Application.
-
- On the header there are three controls
- Refresh – Refresh the DataSource
- Sort – Sorts the Records
- + (New) – Navigates to the new Screen where we can design and capture Customer data.
- For Refresh button onSelect function – Write down the formula to Refresh the DataSource for which the page is bounded (here it is Accounts).”Refresh()” here – Refresh(Accounts).
- On Sort there is a predefined formula UpdateContext({SortDescending1: !SortDescending1}) which sorts the data in descending order.
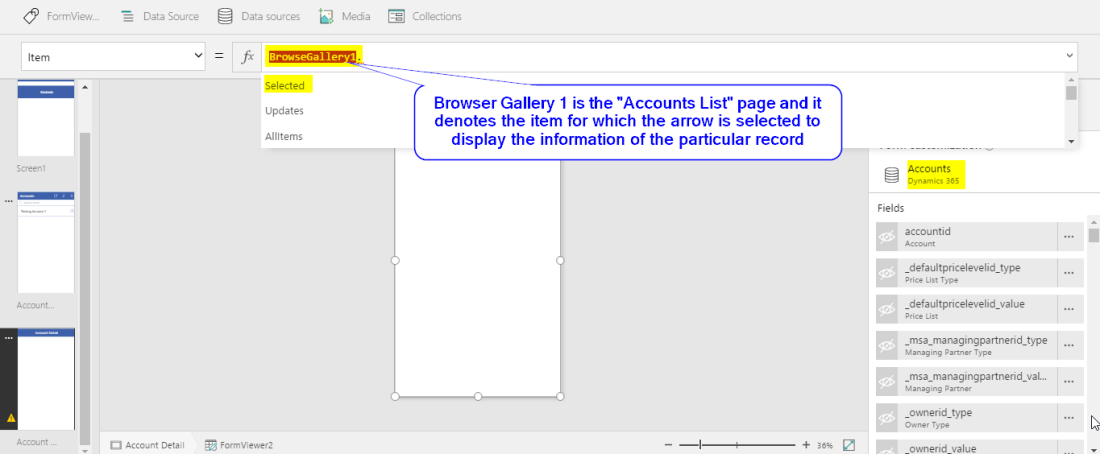
- Now let’s navigate to individual record details – On Select property of the Arrow in the right corner of the items In the list to open the details of the particular record using the following formulaNavigate() here Navigate(“Account Detail”) page
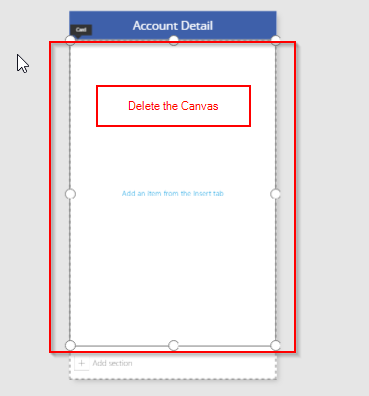
- Create a new Screen name “Account Detail” and click on the first layout and rename the Title as “Account Detail” and click on the below canvas and delete it as shown in the figure
- On the header there are three controls
-
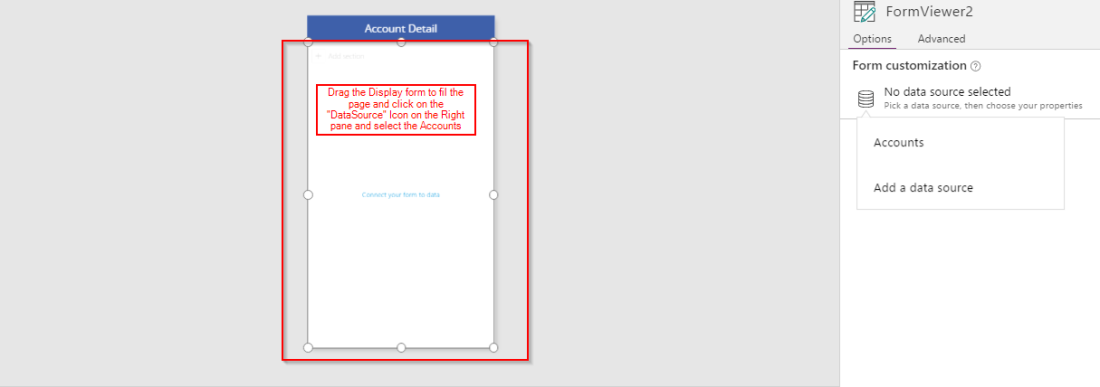
- And insert the “Display Form” from the Insert menu (Insert -> Forms -> Display).
-
- Select the DisplayForm and in the Items Property type the formula below in the formula bar “BrowserGallery1.Selected” to identify the record details for which the arrow is clicked as shown in the figure
-
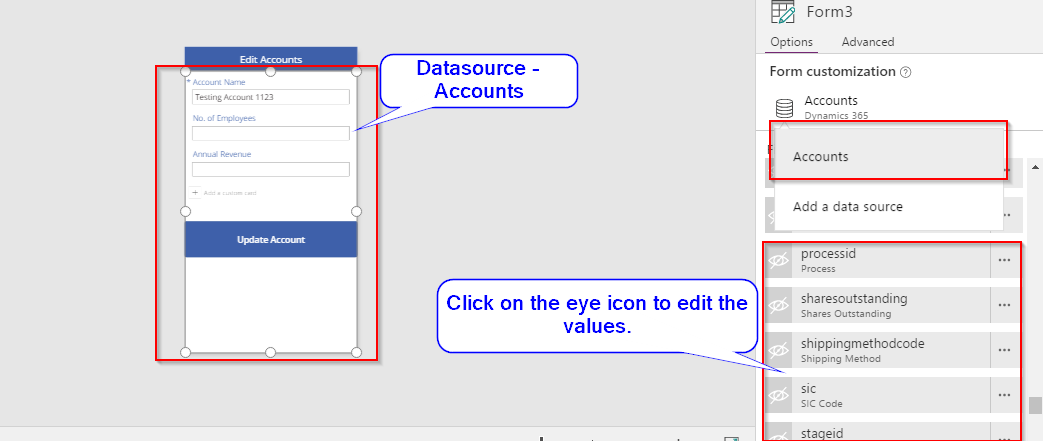
- In the right pane you will be able to see the list of fields to be displayed click on the eye icon which displays the fields value in the display canvas.
- For Picklist – The value is displayed in integer eg (Status Active – 0 is displayed not the word status active) .
- In the preview version there is no provision to take the text of the pick list . We can do a work around like below
- Construct a table and hard code the values and text such as below.
- In the right pane you will be able to see the list of fields to be displayed click on the eye icon which displays the fields value in the display canvas.
LookUp(Table({ Name: “Open”,StatusCode:”100000000″ }, { Name: “Lost”,StatusCode:”0″ },{ Name: “Won”,StatusCode:”1″ }),StatusCode=hsl_closedas).Name
-
-
- For Lookup values only the “Guid” will be displayed – To display the name we have to construct a Lookup formula as below
-
Lookup(Contacts,contactid = ThisItem.primarycontactid,name) – Syntax (Lookup(, = ,column_to_be_retrieved_from_the_targetdatasource))
To use the “TargetDataSource” we have to connect to the Target data source first (Here- Contacts) then we will be able to use it.
To connect Go to DataSources -> AddDataSource -> Dynamics365 -> Select the Organization -> Select the Contacts Entity.
-
- Place a Edit Icon from (Insert->Icons->Edit) and place in the corner of the display form
- Place a Edit icon and (Insert->Icons->Edit) and place in the corner of the display form and in the “OnSelect” property we have to navigate to the Edit form (“Edit Accounts” form).
- Create a new screen (Name: “Edit Screen” ) and select the first layout and edit the “Title” as “Edit Accounts” and delete the Canvas below the title bar . Now insert the “Edit” form from (Insert -> Forms -> Edit) and set the datasource and item same as in the display form.
- Place a Edit Icon from (Insert->Icons->Edit) and place in the corner of the display form
-
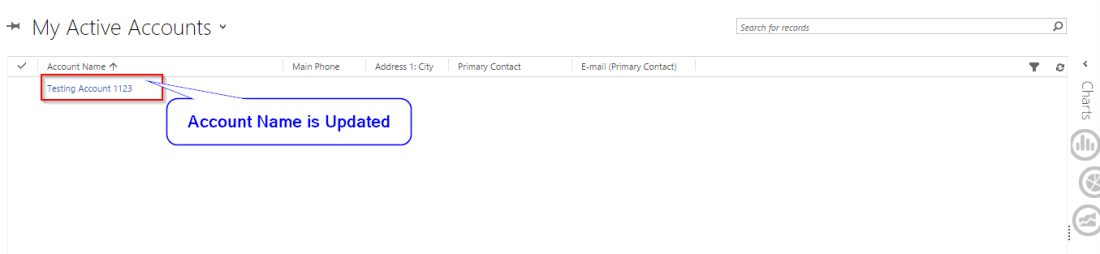
- Insert a button control “Update Account” and OnSelect property of the button enter the formula FormSubmit which validated and submits the form.
- Click on the F5 button to preview the Edit form and change the name of the Account and press Update Account you can see the value is reflected In all the forms and in Dynamics CRM.
-
- For more information on Edit form please refer : https://powerapps.microsoft.com/en-us/tutorials/function-form/
- To navigate to the previous page or to go back place a > icon in the header of each page and OnSelect property enter the command “Navigate()”.
- Similar steps to connect and edit the Contacts.
By this way you can connect and create an Application for each entity in MS CRM , Share Point etc.,
Will discuss in detail about the Sharing, Security Model, Filtering of Records, Collections and using Microsoft Flows in Power Apps in the following posts.
